I was in my local camera store the other day. I was purchasing a small speedlite unit to use on my mirrorless camera. Yes, on-camera. In a twist of fate, in walks in a colleague from my local camera club, same flash unit in hand. We chatted with the salesperson, also a friend.
 My colleague then said: “I’m bringing this flash back. It doesn’t fire consistently.” He demonstrated the problem, with the unit set first on TTL mode and then on manual mode while attached to the hotshoe on his mirrorless camera. He was right. Without changing camera settings, sometimes the speedlite would fire and sometimes it wouldn’t. He returned the unit. But it got me to thinking about how the speedlite and camera work together and how to make sure they always work when needed.
Anyone who has studied photography KNOWS that getting your flash off-camera is a “necessity”. Light quality and direction are typically much improved, resulting in images that are more pleasing to the eye. On-camera flash typically gives that mug-shot look, with minimal complementary shadows and little character.
 There are times, however, when on-camera flash is a necessity. I use it when shooting indoor community events, where I’m mingling with the crowd, where people and their activities are close-by and moving around me. I also use it when even illumination is a good thing, such as for close-up product or macro work.
But that’s an aside in case you didn’t know of the value of on-camera flash, and it’s getting away from the purpose of this post. This post is about how your camera behaves when you use on-camera flash and how to get it to behave the way you want.
First, some technical facts.
 When you introduce artificial light into a scene, and if that light is a strobe or speedlite, instead of just adding light to your existing scene, you are now really dealing with two INDEPENDENT sources of light – the ambient light present in the scene and the pulse of light that will come from the strobe or speedlite. It’s similar in concept to this shot of the Milky Way I took last year – there is light from the sky (ambient light) and light from the cabin (artificial light). Both have to be managed.
If placed on-camera, the strobe or speedlite will illuminate your subject, and ambient light will illuminate your background. It isn’t totally that simple, but pretty close. Because of that, you need to treat each one separately, ideally metering for each, and selecting settings on the speedlite and on the camera that give you the best matched result. That also means that you can be creative with each, combining dark backgrounds with fully illuminated subjects, vice-versa, and everything in between.
That’s often the hardest fact for new photographers to learn – that you have two light sources when you use a speedlite and that both have to be managed.
The camera recognizes that too. As soon as you attach the speedlite to the hotshoe, new menu options and settings become available on the back of the camera and, depending on your speedlite, in the menus of the speedlite as well.
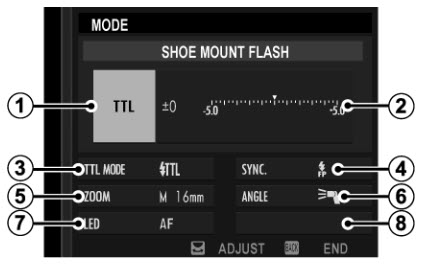 One of those settings is the Flash Mode. To keep things simple, we’ll talk about the two most widely used modes: TTL/ETTL and Manual. The first allows the camera to pick the speedlite settings for the scene, the second puts you totally in charge.
And for our experiment, we’ll pair those speedlite settings with fully automatic and fully manual settings on the camera, respectively.
 If you use fully automatic settings on your camera, and TTL/ETTL settings on your speedlite, the camera will do most, if not all, of the following when you press the shutter halfway:
- set your shutter speed to the designated “sync” speed for your camera; this is the fastest shutter speed that works with your flash
- initially set your ISO to the lowest native ISO for your camera
- may fire a undetectable pre-flash to determine the exposure settings for your subject
- meter the scene during the pre-flash for ambient light levels and for illumination of the subject and set an average exposure setting for both
- open your aperture to a setting that allows for the background to be properly exposed with ambient light
- if your aperture can’t introduce enough light for the background, change the ISO setting to compensate
- set the power level (duration) of the speedlite to provide the right exposure for the subject; NOTE: WITH NEWER MIRRORLESS CAMERAS, in TTL/ETTL mode and with automatic camera settings, THE SPEEDLITE MAY NOT FIRE AT ALL if the average lighting in the scene is sufficient for subject and background exposure
- may provide a preview of the result before taking the image (in some mirrorless cameras) with information on the settings selected
All of the above happens in a split second, with one half-press of the shutter. With a full press, the shutter opens, the speedlite fires and the scene is captured.
 At the opposite extreme, if you use fully manual settings on your camera, and fully manual settings on your speedlite, the following happens when you press the shutter halfway:
- aperture, shutter speed and ISO are set manually by you and do not change; a warning about the flash sync speed may appear if the selected shutter speed is too fast; the speedlite MAY ALSO AUTOMICALLY SHIFT into a high speed sync mode to compensate
- flash power (duration) is set manually by you and does not change (but the mode may change if needed as noted above)
- a undetectable pre-flash may fire, but only to assist with focus; your choice on whether it does
- camera still meters the scene for both subject and background exposure; some cameras will provide exposure warning information if the manual settings cause the scene to be under or overexposed
- a preview of the result may be provided (some mirrorless cameras) with information on the settings applied
With a full press of the shutter, the speedlite fires, the shutter opens and the scene is captured.
 Cameras and speedlites are becoming increasingly smarter. In the “good old days”, which literally means up to the last 10 years, speedlites would fire as long as they were on. The only choices for the photographer were how long they fire and how frequently they fire.
 Today, like cellphones where the built-in flash can be set to “automatic” and the flash fires only when needed, some cameras also make choices about including the second light source and/or what mode the speedlite should be in. Like cellphones, more and more cameras have algorithms and computational processes that compute the best “look” for the image and turn on light accordingly. In fully automatic mode, they decide if the background should be featured or not. They decide if the subject has too many or too few shadows.
So my colleague in the store was a bit surprised when I mentioned that the camera might be making a choice to fire the speedlite for him. He switched to manual mode on the speedlite and, sadly, the intermittent problem was still there. It’s possible that other camera settings were making choices for the speedlite, but he was in a rush so we didn’t check these. Other causes for his problem are more mundane: dirty contacts, a loose hotshot connection, old batteries or not enough time elapsed to recharge the flash. In some cameras, you also have to enable the flash once it is connected. That obviously wasn’t the case here, since it fired intermittently.
We didn’t solve his problem that day. But I did buy the same unit and have used it happily for a few weeks with no issue. My geekie side took the time to find out exactly how it works with my camera. Sorry for saying this, but we do need to read the manual once, if only to find out how much automation our new toys have as compared to the last generation of new toys. It’s better to be pleasantly surprised ahead of time than frustratingly surprised at a shoot. It might also save a trip back to the camera store.
