One of the greatest advancements in photography has been the invention of autofocus. Simply by pointing your camera at a subject and pressing the shutter halfway, the camera will not only meter the ambient light, but bring the main subject into sharp focus.
 As with most things photographic, there is theory and there is practice and sometimes the two don’t mesh exactly. Here’s what I’ve learned about autofocus.
The first thing to realize is that your subject exists in three dimensional space while your camera works in two dimensions. It attempts to bring everything in your life-sized scene into perfect position and alignment on your small flat camera sensor. Height, width and depth are translated by the camera into height, width and hopefully sharp focus. This is a really important concept to grasp. For more on this, see this great article for B&H Photo and Video by Todd Vorencamp, called “How Focus Works”.
The second thing to realize is that the optical properties of your lens, the f-stop selected, the distance to the subject and how you frame your shot all influence whether and how much of your subject will be in sharp focus. Understanding these aspects of camera theory is important. But, as I recently discovered, you can also let the camera do some or all of the work for you (see Being in Control). No guarantee though that the camera will have the same “vision” that you had for the shot.
The third thing to realize (duh!) is that most cameras have options for handling autofocus. Even if you let the camera do the work, you do have to give it some parameters, usually from menus or through buttons on the camera. If no choices are made, a default set is used.

So what are those choices?
- Identifying the most important element in the composition is so that sharp focus is “guaranteed” at that point.
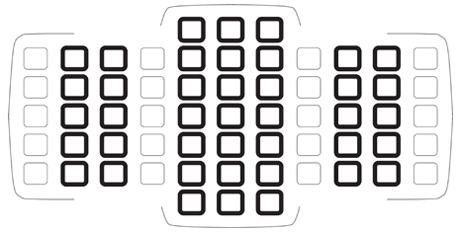
- Picking either a single focus point (you have full control) or a larger-sized zone of focus points from which one or more will be selected by the camera (you have partial control).
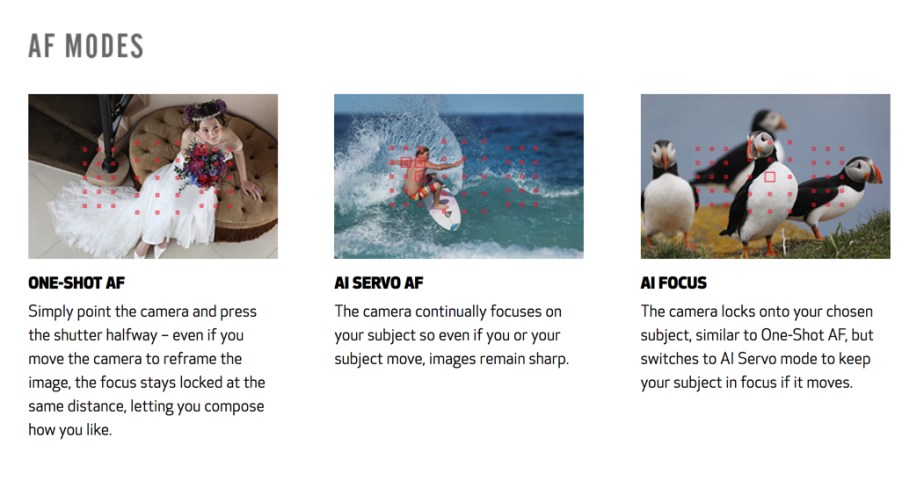
- Selecting one-time or continuous autofocus to account for either stationary or moving subjects respectively.
- Assisting the camera in finding autofocus in low light through the use of supplemental optical or infrared light sources, either built into the camera or attached separately.
- Swtiching to and knowing how to use manual focus when autofocus is not successful.
The previously mentioned Todd Vorenkamp also published a great article on autofocus modes and when to select them. It’s called, not surprisingly, “Choosing Autofocus Modes”.
But how does autofocus actually work? Forgive me while I indulge my inner nerd.
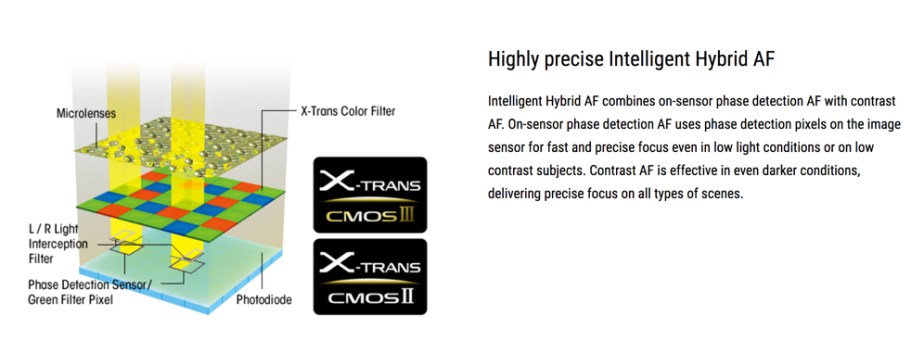
 There are two main autofocus systems: phase detection and contrast detection. Both of these are considered “passive” systems since they depend on the light coming into the camera. So, the lower the light, the harder it will be to focus. Autofocus systems, like many other systems in the camera, work best at the “sweet spot” settings for any given lens: the middle aperture values when there is enough light (f/5.6, f/8, f/11), the middle focal lengths for any zoom lens, and in the middle of the field of view.
 Phase detection is very similar to what our eyes use to focus. Because our eyes are on opposite sides of our faces, the image we see with each eye is slightly different and our brains combine the two images and, very smartly, intepret how far away the subject is. Our brains then focus our eyes perfectly on that subject. Phase detection in cameras splits the image coming through the lens and does the same thing – combines the right and left side views to mathematically calculate how far away the subject is. This is a newer technology and has improved the speed and accuracy of autofocus enormously. However, for technical reasons, phase detection autofocus can be stumped by prominent horizontal or vertical lines in a scene. Also for technical reasons, these types of sensors have to reside in the centre of the field of view. So the speediest and most accurate autofocus is always in the centre of the field of view.
 Contrast detection autofocus, which is an older technology, simply looks for the maximum contrast between two adjacent pixels. It is slower than phase detection, because the camera focal plane has to move back and forth several times until the sharpest contrast is identified. This method is usually inaccurate for moving subjects since the focal plane doesn’t know which way to move to keep up with the subject. It determines this through trial and error. But this form of autofocus tends to be more accurate than phase detection in low light. And these types of sensors can reside across the entire field of view.
For more detail about how these two systems work, check out the Todd Vorenkamp article I mentioned earlier.
Because of the limitations of each system, most higher-end cameras include both types of autofocus systems, even overlapping them to provide maximum flexibility for the situation. The amount of the field of view covered by each type of system (or by the autofocus system in total) varies with different cameras.
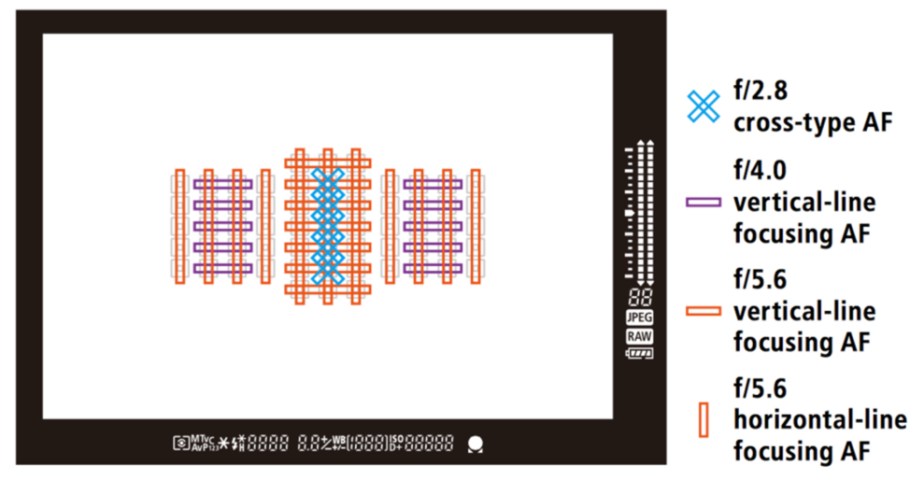 Manufacturers continue to innovate, to get more speed and accuracy. The latest designs place tiny phase detection autofocus sensors right on the image sensor. To overcome the vertical/horizontal problem with phase detection, camera manufacturers introduced “cross-type” autofocus sensors, that look for horizontal lines when vertical lines get in the way and vice-versa.
With the fastest and most accurate autofocus always in the centre of the field of view, we have a problem. We are taught not to frame our subjects in dead centre. Rule of Thirds, Magic Ratio encourage the subject to be off to the side. So, we need a way to move our focus point/zone away from centre. One way to change it is to physically move the camera (check out “focus and recompose” if you are interested). Another way is to use buttons on the camera to move the focus point/zone away from centre, with the risk of losing some speed and accuracy.
 For me, it’s faster and easier to use focus and recompose, rather than use buttons or a joystick to move my focus point/zone. I think it’s also more accurate. It seems many photographers agree. And I guess a third method might be to simply crop the image in post-production, placing the subject where it is most appealing.
So the other question to answer is single point vs. zone autofocus. I typically use focus zones rather than a single focus point when I shoot, because they provide me with a clear indication of how much of my subject is in focus (multiple green squares light up) and give me a better chance of having SOMETHING in focus, particularly with complex or moving subjects. The more movement, the larger the zone I select. But this means I give up control over which exact spot will be in focus. I do vary the size of the focus zone depending on the complexity or movement of the subject.
If you shoot portraits or stationary subjects where aesthetic and artistic guidelines demand precision, use single point autofocus. There’s nothing worse in a portrait than an in-focus nose and out of focus eyes.
How can you increase the likelihood of a successful (and fast) autofocus result?
- maximize the depth of field in your shot (through lens choice, aperture selection and subject to camera distance); but sometimes you want background or even foreground blur – find the right balance
- maximize the contrast in your shot (by changing your position, seeking out the best time of day, considering alternative compositions)
- anticipate any movement by your subject(s) and pick the right autofocus settings for the job (one-time vs. continuous, single point vs. zone, etc.); some cameras offer built-in scene options depending on whether the subject is moving laterally or moving toward you and whether the movement is erratic or smooth
- use the “sweet spot” settings when possible (mid-range aperture, mid-range focal length, middle of the field of view)
- reviewing other camera settings for anything that might hinder good autofocus in that situation; for example, image stabilization, if you have it, can interfere with autofocus when panning (that’s a whole other blog post)
- be aware of conditions that might interfere with autofocus, such as low light, shiny backgrounds or shiny subjects, shooting through glass, foreground obstructions, etc.; compensate when possible


I recently went with friends to photograph birds along some of our winter waterways. I am not primarily a nature photographer, but enjoy it when I can. I tried my hand at birds in flight, but found only a few of my shots resulted in acceptably-focused images. The reason: I didn’t always tell the camera what I wanted. I didn’t constantly adjust for the scene. I didn’t follow my own advice.
Autofocus can be your best friend, and your worst enemy. It goes without saying that practice makes perfect. I admit I still need the practice.
