Spring has sprung. New life all around us, providing a wealth of photographic subjects. Perfect for macro photography. Macro photography reveals the smallest of these subjects, from tiny lichens to the wing details of insects to the inner sculpture of a summer bloom.
 Macro photography requires only one unique piece of equipment: a lens that can focus within a tiny distance of the subject, resulting in an image that is the same size on the camera sensor as the subject is in real life. But macro lenses have an amazingly small depth of field, almost guaranteeing that some part of the image will be out of focus. What’s a photographer to do?
The answer, like many things in life, is “it depends”.
Selective focus can be an artisitic choice, highlighting the single most important feature of the subject. But the complexity of most macro subjects can make this very challenging. Few natural objects have a single “important feature”.
Some photographers handle this by breaking the shot into multiple shots, each one showcasing a different feature. The shots then become a series – the edge of a leaf, the curve of a petal, the backside contour where petals meet stem. The images are displayed side by side.


But if tack sharp focus is the goal across the entire subject, a few steps are needed. The first step is to minimize the overall subject depth required. Rotating or repositioning the subject or the photographer can help substantially. But that will never completely eliminate the problem, since the resulting photograph is a two dimensional image of a three dimensional subject.
With today’s post production software, another option is to take a series of “slices” at different focus distances, passing through the full depth of the subject, then using the software to combine multiple images into one. This is called “focus stacking”. Great – sounds like the perfect solution. Until we discover just how difficult it is to collect the slices.
Remember that depth of field problem? For a relatively complex subject with lots of bends and twists, the focus distance change needed from one slice to the next might be a few millimeters. There might be a hundred images needed to fully cover the subject from front to back.
Some photographers are able to collect the images manually, which I find amazing. By manually, I mean by handholding the camera rigidly to their body and gently, subtly rocking back and forth on their heels so as to bring the back, middle and front of the subject in focus in successive frames. One such photographer is Don Komarechka, who is a local nature, macro and landscape photographer.
Don’s macro images are stunning and equisitely detailed. He has developed his method over many many hundreds of hours of practice.
Why ever try this manually? Convenience. The more equipment that is needed, the more cumbersome is the setup, especially outdoors. Time is also a concern. Some subjects are fleeting, like snowflakes. Of course, there is also overall expense. And some photographers simply prefer to have full control of the process.
 As an older photographer, there are definite limits on what I can do manually. For most people, including me, creating millimeter progressive slices requires some extra equipment. There are four setups that work well, depending on budget, the level of precision required and the level of comfort and control desired:
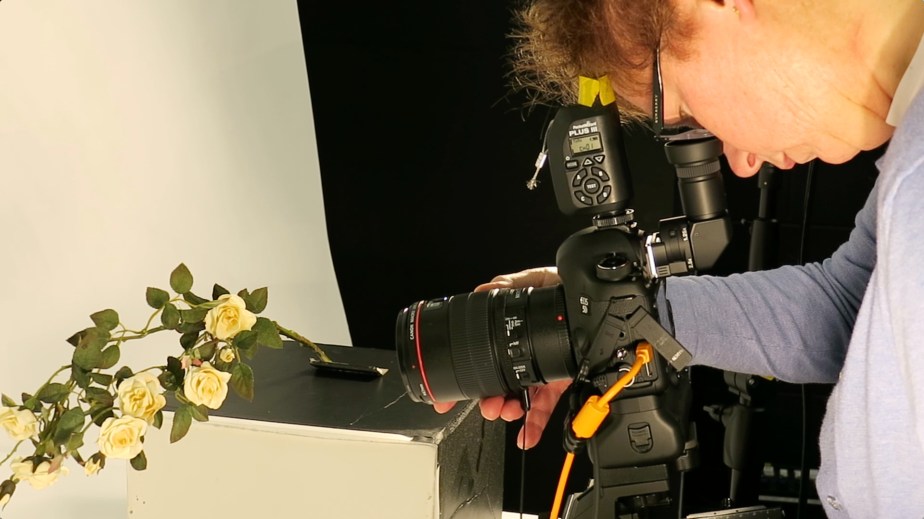
- Setup 1: a tripod, with lockable, heavy duty, steady legs and head; a remote conrol for triggering the camera; a steady hand on the lens to be able to move the focus distance in small increments, adjusted by hand
- Setup 2: all of the above, but with an addition of a sliding rail system that allows for minute movements of the camera forward or backward; eliminates the need to adjust the lens focus distance; this railing system can be manually adjusted or electronically controlled; it may provide more precise control since there are increment markings on the railings
- Setup 3: all of the above, but with the addition of a tethered computer and software that can assess the deepest and the shallowest slices then compute the number of intermediate slices required to get a sharp image; the software may then guide the photographer in collecting the slices or it can control the sliding rail system directly
- Setup 4: a variation on the above, where the software doesn’t move a sliding rail system, but instead adjusts the focus distance of the lens directly while the body of the camera remains stationary on the tripod; a little less hardware required, but this only works with lenses having autofocus capability
There is a tradeoff: no insect, raindrop, bird wing or other natural subject will wait for setup of a tethered camera and computer. The challenge of lugging it to the site is also a limitation. So most serious macro photographers will have two setups: one for outdoor shooting and one for indoor work.
For outdoor or out-of-studio setups, I’ve profiled the CamRanger in a previous post. It’s a wireless tethering tool that allows you to control the camera using tablet or phone. It has built-in focus stacking capability and will collect a sequence of precise slices by changing the focus distance of an autofocus capable lens. A tripod mounted camera is required. This tool does not, however, process the stack of images into a single final image. For that, transfer of the stack to a computer is required.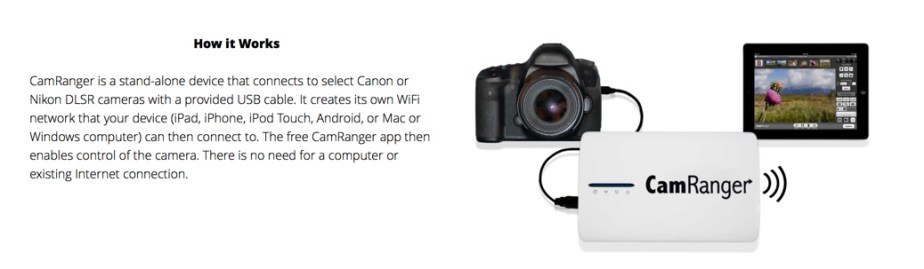
The setup is easy: all the equipment can be attached directly to the tripod (including the tablet) and the entire package is relatively easy to lift and move around the general area. It isn’t practical in a setting where the photographer is hiking variable terrain, but in a meadow, or along a river, it’s a great setup.
In studio, I rely on a setup that includes my computer and software called Helicon Focus Pro. This package is comprised of Helicon Remote and Helicon Focus. The first controls the camera during capture; the second identifies the slices required and processes the stack once it is collected.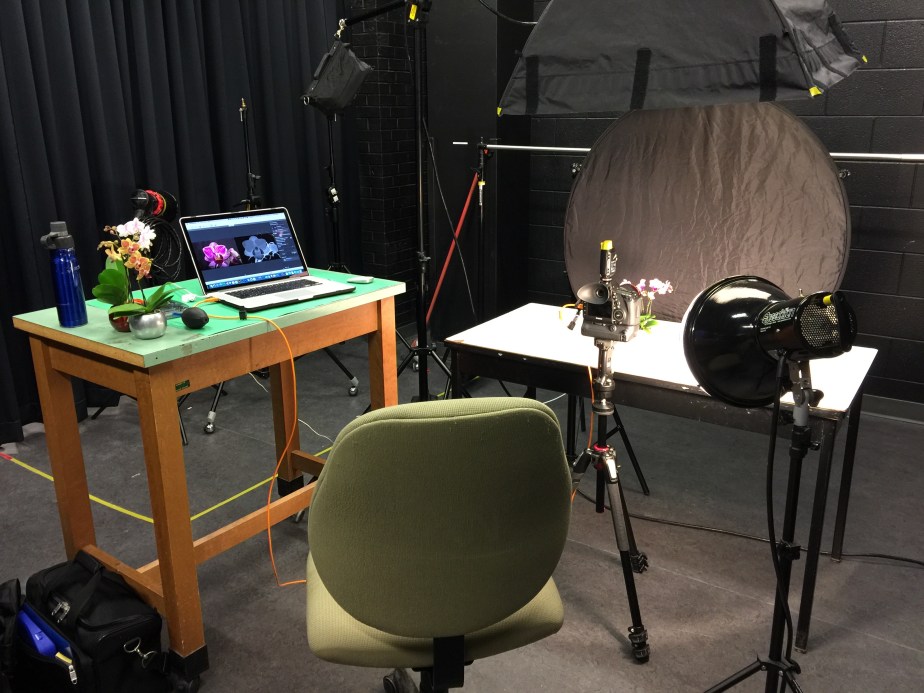
Why not use my field setup indoors? The computer and Helicon software are more powerful, and allow for finer stacks with more precisely defined start and end points. I don’t have to transfer the images after capture. And it’s just easier for me to see the images on a computer rather than a tablet. Another limitation of being an older photographer.
Helicon Focus creates the final stacked image, and includes a choice of algorithms to help achieve the perfect result. In fact, I use the Helicon Focus software to process images collected with the CamRanger. It makes sense to do this separately back at the studio, since each stack can take up to 5 minutes to process. The software identifies the points in focus in each image slice and layers those into the composite final result.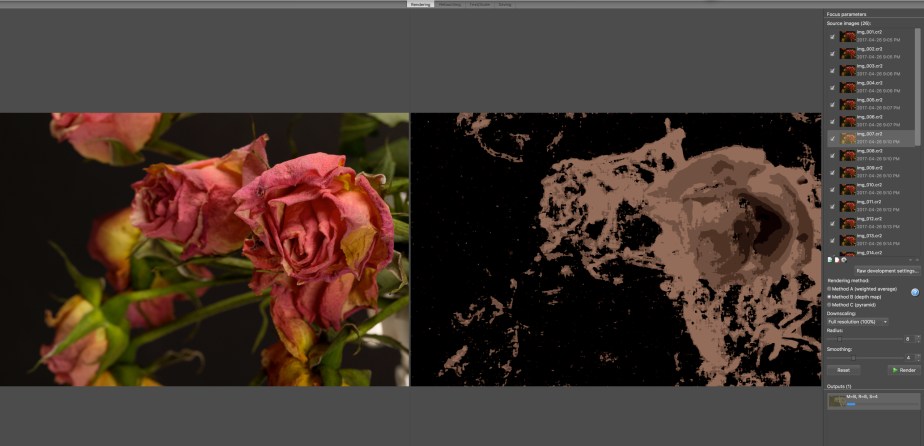
I understand the arguments of purists who feel that photography has become too automated and automatic. From previous posts, readers will know that I have my own limits on collection and processing methods. But when help is needed to enable older photographers to continue to enjoy their craft, I’m all for it. We still make many many choices on the look of the final result; it’s just that some of the heavy lifting is a little less heavy.

You are amazing. I will be talking to you soon on this and wanting a full demonstration!
LikeLike
Thanks so much Donna. Looking forward to putting on a show for you.
LikeLike
Great read Nina!!
LikeLike
Thanks, Katie. Appreciate the support.
LikeLike