In the first of what I hope will be an ongoing series, I’m profiling one of the many tools that help to make my photography easier. When I say easier, I’m thinking about this from several perspectives:
- achieving an effect that would otherwise be time consuming or overly complicated,
- getting a shot that, because of site or equipment limits, might be difficult or impossible,
- automating tasks that would be time consuming, tedious or repetitive,
- compensating for one or more of the personal challenges we might have as photographers (getting older, mobility issues, etc.)
- alternatives to expensive, top of the line solutions for any of the above
These won’t be “reviews” in the traditional sense. Instead, they’ll discuss how I use the tools and what advantages they provide to me. Hopefully they’ll help you too. This month: 
CamRanger is a small battery operated device about the size of a credit card in width and length and about 1/2 inch in depth. It has a power switch, USB port, high speed network port and wifi capabilities. Essentially, it is a personal portable network you can carry with you. Why would you want to? Because for non-wifi enabled cameras, it creates a way of controlling all functions of the camera from an iPad or iPhone, or wirelessly from your computer, and provides a live image to work with, replicating live view on your camera. The best part – the camera can be in another room, or many feet away, and still be connected perfectly to the unit. The system is also compatible with Android devices.
I’ve used it for two purposes so far:
- taking pictures when I could not be behind the camera because I needed to be in the scene, and
- controlling my camera for 20-40 focus-stacked image bursts of the same subject where I was using a macro lens. Here, the lens moved forward by millimetres with each new exposure to create a stack of images that could be combined in post-processing to maximize the depth of field of the final image.
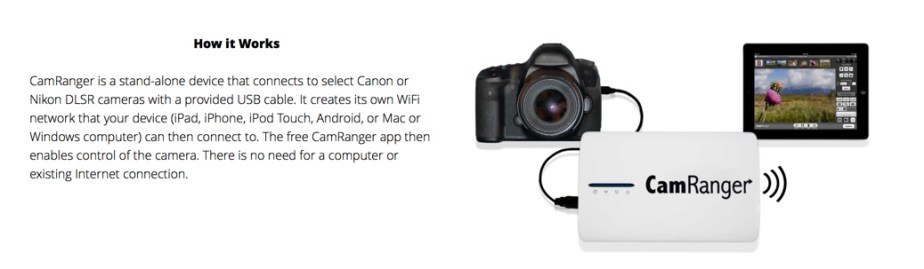 CamRanger is very easy to set up out of the box. Charge up the battery, turn it on, connect the USB cable to your camera, turn it on, load the mobile software on your iPhone or iPad or other device, locate the CamRanger “network” and connect to it using the password supplied with the unit. That’s all there is to it. When you open the mobile software, it will find your camera, connect to it and all the controls are now at your fingertips.
From this point on, operate the controls just as you would the actual camera. To focus the camera, simply tap on the area of the live view image where you want focus to be sharp and the camera will adjust it (assuming you have the camera set up to autofocus for you) – you can also zoom into that area on your device and check it that way as well.
In addition to replicating the controls on your camera, the software provides control capabilities for special functions such as time lapse photography or the aforementioned focus stacking. In the former, you can select the session duration and frequency of the shots, as well as all of the other required camera settings. In the latter, CamRanger can move the focus plane of the camera forward by changing focus on the lens, or users can purchase an accessory slider rail for their tripods that will physically move the camera forward and is also controlled by the software.
No images are saved to the mobile device or computer – they remain in the camera. A small thumbnail preview of the final image is available as a quick look, and the CamRanger can download the image from the camera to the device for a closer look. But you wouldn’t want to do that with every image. Not only would it consume too much memory on the device, the transfer is relatively slow and battery life of both devices would be severely compromised as a result.
 After working with the unit for a while, I’ve noted only a few minor concerns, along with one important tip to make using the device easier. The tip? Turn off any image review on your camera before you start working with the CamRanger. Most cameras will show you the image you’ve just taken for a few seconds after capture. This display stops all other functions from occurring while the image is displayed and if you have a time lapse or focus stacking sequence running, you may be surprised to notice that nothing is happening at each interval you have selected, if that interval falls within the duration set for image display after capture. So, it’s easiest to just turn this off on your camera.
What are my concerns? The first is live image display and ability to focus the camera in a studio setting where you are not using continuous lighting and have limited ambient lighting. The second is a very basic focus stacking process that could be improved. The third is the method that must be used to charge the unit.
In most studios where strobe lighting is used, there is still enough ambient light (either from room lighting or from modelling lights on the strobes) to allow the photographer to set up and initially focus the camera. However, when controlling the camera from the CamRanger in this situation, there is often not enough detail visible on the mobile device screen to be able to frame and focus from the app. To compensate, I typically open up ISO and stop down the aperture to let in more light during live view, finalize my framing and focus, then reset ISO and F-stop to desired settings. A minor nuisance only, but required each time the subject moves. It’s not an issue for macro or still life shots.
When I’m using the CamRanger for macro photography, the focus stacking process requires three decisions: what’s the closest point to the camera that must be in focus, what’s the furthest point from the camera that must be in focus, and how many steps in between should you take to get from one to the other. There are software packages that will control the camera for this in a tethered fashion, but CamRanger is the only one I’ve found that will do it wirelessly. Most software allows the photographer to identify the closest and furthest points and the precision of the shots required – the software will then calculate the number of shots to be taken and will start at the closest point and stop at the furthest point. CamRanger simply asks what is the closest point, how many shots should be taken and how far apart they should be. Here, the photographer has to guess whether the settings selected will actually cover the full range required, since no “furthest” point is identified. It would be a useful enhancement to add that capability.

I’ve easily used the CamRanger for 3 hours of almost continuous shooting without draining the battery. The battery is removable and spare batteries are available for purchase. But unlike most other devices that provide a separate charger for their batteries, the only way to charge the CamRanger battery is to leave it in the unit and connect the unit to a wall outlet. This means that in a setting where power outlets are not present or not nearby, battery recharge has to wait. And the time it takes to charge the battery is actually longer than the maximum battery life expected, which is about 5 hours of active shooting. Definitely room for improvement here.
Overall though, the CamRanger has been a very useful addition to my kit. Its versatility in different photography situations, as well as the variety of devices the software can run on, means that there should always be an answer when camera and photographer are separated or when it would be convenient to be (such as running an outdoor time lapse sequence from your living room couch). Not that I would ever do that…

One thought on “Tools That Make My Photography Easier – CamRanger”
Comments are closed.