A few days ago, I published a single image that was the result of months of elapsed time (days of actual time) and represents the most effort I have ever put into a single photographic image. The image? The Rosette Nebula, a hydrogen gas cloud in the Milky Way Galaxy, our galaxy. These gas clouds are either stellar nurseries or the remnants of stellar explosions. Either way, they populate the sky with amazingly photogenic objects.
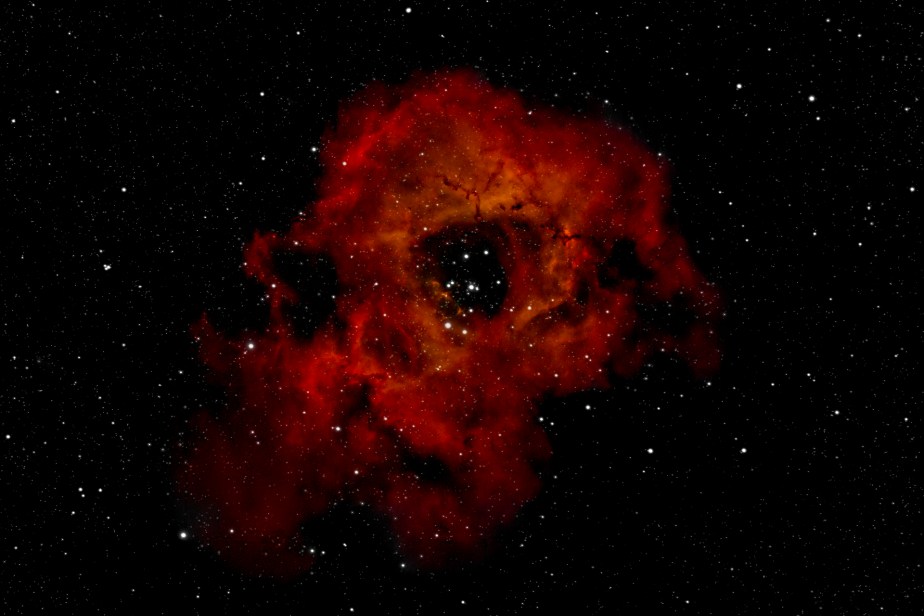
These gas clouds either emit or reflect light. As such, we should be able to photograph them as we would other subjects, right? While all the photographic “rules” apply about exposure, composition, white balance, sharpness and colour saturation, they are multiplied exponentially when dealing with objects that, in this case, are a whopping 5,000 light years from us in distance.
Just take a moment to understand what this means: light travels at 286,000 miles PER SECOND. Multiply that by 60 for a minute, by 60 again for an hour and by 24 for a day. Then by 365 for one light year. Then by 5,000 for this object. That means it is 9,019,296,000,000 miles from the Earth! It is NOT visible with the naked eye. It is NOT visible with a regular camera used as regular cameras are used. And on top of that, the Earth rotates at 1,038 miles per hour at the equator, meaning that any attempt to focus on such a distant object for any long exposure to catch that tiny fraction of light coming our way has to take the Earth’s motion into account as well. Trying to photograph a tiny newly hatched sea turtle swimming on the ocean while you are in a boat a thousand miles away, bobbing on a strong ocean current would be easier than this. Or would it?
I wanted to tell the story of this image, because it blows my mind that we have equipment, now relatively easy for beginners like me to use, that can not only find this infinitesimally small object in the sky, but lock onto it and expose a sensor to that miniscule amount of light in just the right way to allow this image to be made. The difference between space and my sea turtle example is that every position and movement in space is predictable, and can now be catalogued, stored and recalled in devices that fit in the palm of your hand. And that same device can control the movement of your equipment, to precisely match the movement of the Earth and compensate for any artefacts in the initial positioning of the object in the sky. Those artefacts might include distortions arising from pollution or moisture in the atmosphere, or even distant space objects exerting distorting effects on the light from the object you are trying to capture. That same palm of the hand device can compensate for those artefacts too.

I purchased a full telescope setup in 2022, with the advice of the wonderful owner of Ontario Telescopes, Stephen Mallia. He recognized that as a beginner, I needed to have as much “working room” or room for error as possible and he set me up with a system that would capture what by many standards is a large chunk of the sky at once. Luckily, many of the objects beginners start with are also large (relatively speaking), and fill the frame nicely even with what is a relatively small focal length telescope like mine (350mm).
There are lots of videos on how to use a telescope and lots more about processing images. Instead of talking about those things, I wanted to give a bit of insight into what caused me the most grief during this first major project:
- Lack of clear skies. Living in the Toronto area, whole segments of the year have nothing but cloudy skies. Several times, I would get set up on what I thought was a clear night, only to have clouds move in unexpectedly. And yes, I used all the right apps to plan my night outside but the apps were wrong too.
- Too many trees. I love shade in the summer, and planted my subdivision lot with lots of trees, not realizing that these get in the way of astrophotography, even when bare in the winter. So the only clear space I have to shoot from is my driveway, which means I am sitting outside, guarding the telescope through all manner of weather, especially cold, crisp, clear nights. This despite the fact that with the newest technology, I could easily control my scope from my living room couch.
- Light pollution. I live on the edge of Toronto. I can use special filters to block some of the city light pollution and I can limit my image capture to angles above the light pollution (45 degrees or more above the horizon), or stay away from the south and west, but that adds complexity to my captures. Unfortunately, being on my driveway also means that lights from the street, surrounding houses, and lights from any passing cars can ruin an exposure. So I have to find the perfect position on my driveway to minimize all of those polluting elements. I could take the telescope out of town to a dark sky location, but that adds annoyance and inconvenience, especially if the clouds roll in. Luckily, this rig is fairly portable, so I’ve not completely abandoned the idea of finding a better spot.
- Polar alignment. The amount of automation built into the telescope control equipment is amazing. But the key to success on any night is the ability to point the main axis of the telescope to the same line as the rotation of the Earth. I haven’t learned how to do this efficiently yet. It usually takes me 20-30 minutes to roll out the telescope, point it in what I think is the right direction and use the built-in software to confirm alignment, each time I shoot.
- Focusing the cameras. Note I said cameras. There are two cameras: the main imaging camera, which is a MFT colour camera with integrated cooling, and a guide camera to keep an eye on the rotation accuracy of my telescope, which is an even smaller sensor camera, in this case a mono camera, whose only role is to send signals to the telescope motor to adjust the rotation alignment. Focusing these cameras takes me still a very long time, despite automation for which I am grateful. And as the temperatures change through the night, the optics do as well, calling for another focus run every couple of hours or so. That stops the imaging run until completed.
- Length of exposure. There is a very fine line in astrophotography between maximum light capture and horrible image noise. Light pollution factors into that noise and limits the length of exposure that I can reasonably take in my area. So one calculation that is needed for every object is: is it better to take 150-2 minute images or 60-5 minute images or some other combination. I still don’t always make the right decision.
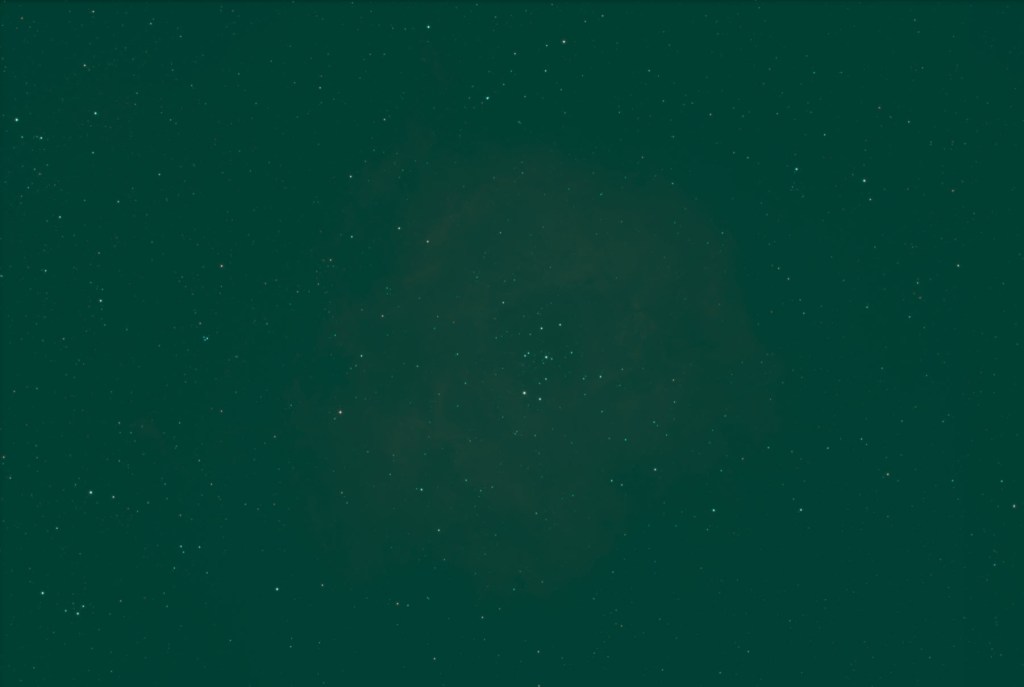
- Stacking of frames. Once you have collected all of your shots, they have to be stacked to minimize noise and maximize the “good pixels”. But the resulting stacked image looks like nothing recognizable, because all of the pixels are “exposed to the left”, in fact so far left that you see absolutely nothing in the compiled result. Processing that result into something recognizable is not a standard series of steps – at least, not a standard series that I have yet found. I’m still looking. Everyone in this hobby has an opinion. Sorting through the good and bad advice isn’t easy. See an example of the stacked, unprocessed image below.
- Calibration frames. You don’t just need your images. To ensure you keep just the image detail and throw away as much noise and artefact as possible when you process your images, you need what are called calibration frames. Any time you leave a sensor exposed for 2, 5, 10 minutes, the sensor heats up and produces hot spots and image artefacts that have nothing to do with photographing your subject. So, there are a series of images you collect separately from your imaging run, with the telescope covered, and then you use software to “subtract” those artefacts from the final result. These calibration frames are temperature dependent and exposure time dependent. So you need a set for every temperature you will be shooting in and every exposure time you plan to use. Assembling all of this takes time. Haven’t figured out how to do this efficiently either. And as your equipment ages, you have to reshoot these on a regular basis. See an example of one type of artefact, in this case called “amp glow” in the calibration frame below.
- Power. All of this requires a power source. Luckily, with the garage nearby, plugging in is not a problem. But I use a portable power pack that lets me be anywhere anytime and still run my rig. It has to have 12 volt, 120 volt and USB connections. And you have to remember to keep it charged!
- Processing Software. While Photoshop is excellent for most normal photographic situations, it may not have the range of sliders needed to finalize a deep sky image. I did use Photoshop here. My image had 10 “levels” adjustment layers and 8 “curves” adjustment layers, along with colour calibration layers, noise removal layers and sharpening. Luckily, specialized plugins and specialized software now exist to make these repeated tasks easier, but I haven’t yet landed on the perfect workflow. Some astrophotographers spend days processing a single image.
- Staying Warm. The clearest skies occur in the winter, which is also the time when most of the objects beginners want to photograph are visible. You have to like the cold, and figure out ways to stay warm. I now have battery operated gloves, jacket, and insoles, along with a space heater. If you can set up in a secure area, and stay inside where it is warm, that is much more better.

I won’t tell you about the setup mistakes I made, the number of times I wanted to throw the telescope out on the road, the times the control software didn’t work properly or lost track of the stars it was following or the number of lost frames due to some problem or random light source. But I am proud of this final accomplishment and frankly the quality of the image. I can also comment on the sense of amazement I had when I saw the faint outline of the first capture revealed on my iPad (I use an iPad to control my telescope) of that object so far away. I felt both small and a champion of the world at the same time.
If you do want a hobby you can jump in with both feet, I highly recommend astrophotography. It is truly the final frontier.

You are amazing!
LikeLiked by 1 person
Nina, congratulations on your perseverance and commitment and achievement. And also on sharing your experience through this thoughtful article, with examples. You do not accept limitations, you work your way through. Fantastic.
John
LikeLiked by 1 person